In the fast-paced world of modern communication, the ability to schedule emails has become an invaluable feature. With Microsoft Outlook, a widely used email client, you can effortlessly manage your inbox by scheduling emails to be sent at the most optimal times. This article, Trendbbq provides a comprehensive guide on how to schedule an email in Outlook, streamlining your communication and productivity.
Table of Contents,
1. What is Scheduling an Email in Outlook?
Scheduling an email in Outlook refers to the process of composing an email and setting a specific date and time for it to be sent in the future. This feature allows you to prepare and draft emails ahead of time, but instead of sending them immediately, you can choose to have them automatically sent at a later, predetermined time.
Scheduling emails can be beneficial for various reasons:
- Time Zones: If you’re communicating with recipients in different time zones, scheduling emails ensures that your message arrives at a convenient time for them.
- Work Hours: You might want to draft emails outside of regular work hours but send them during work hours to maintain professionalism.
- Reminders and Announcements: You can schedule reminders, announcements, or important updates to be sent at a specific date and time, ensuring that your message reaches recipients when it’s most relevant.
- Batch Processing: Scheduling emails allows you to batch process your communication tasks, making it more efficient to draft several emails at once and have them sent over time.
- Limited Connectivity: If you anticipate being offline or unavailable at a certain time, scheduling emails ensures that your communication continues without interruption.
2. Understanding the Benefits of Email Scheduling
Email scheduling in outlook offers several advantages. Whether you’re working across different time zones, aiming for a specific time of day to increase email visibility, or simply planning ahead to stay organized, this feature can be a game-changer. By strategically sending emails at the right time, you can improve your chances of getting timely responses and ensure your messages don’t get lost in a crowded inbox.
3. How to schedule an email in outlook
Setting up a scheduled email in Outlook offers the convenience of drafting a message and specifying the exact date and time for it to be dispatched. This functionality proves valuable when you want to precompose emails and have them dispatched automatically at the appropriate juncture. Here’s a step-by-step guide on how to schedule an email in Outlook:
(Note: The instructions might slightly differ based on the version of Outlook you’re using.)
Initiate a Fresh Email: To begin, open Microsoft Outlook and tap the “New Email” button to initiate the composition of a new email.
Compose Your Message: Compose your email just as you usually would, adding recipients, a subject line, and the content of the email.
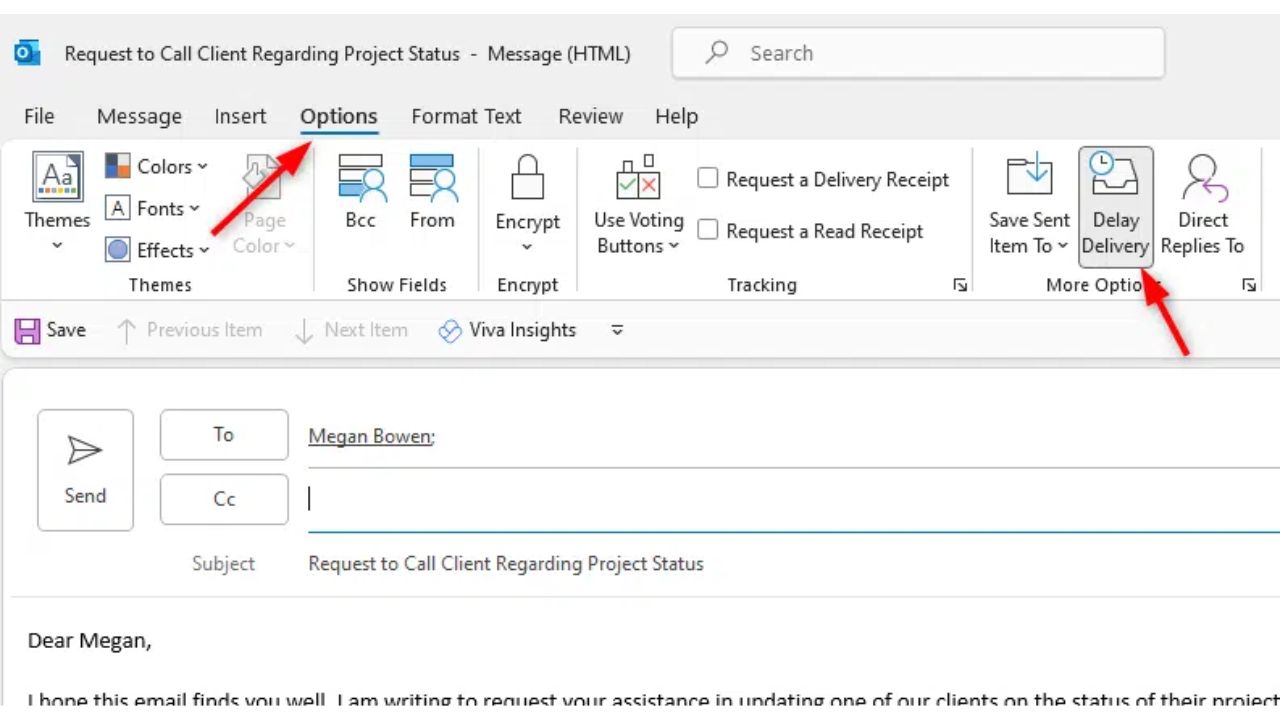
Access the Options Tab: Once your email is ready, head to the “Options” tab within the email composition window. Typically, you’ll find this tab on the ribbon at the upper part of the email interface.
Select “Delay Delivery”: Within the “Options” tab, locate the “Delay Delivery” or “Delay Send” option. This is the feature you’ll utilize to schedule the email.

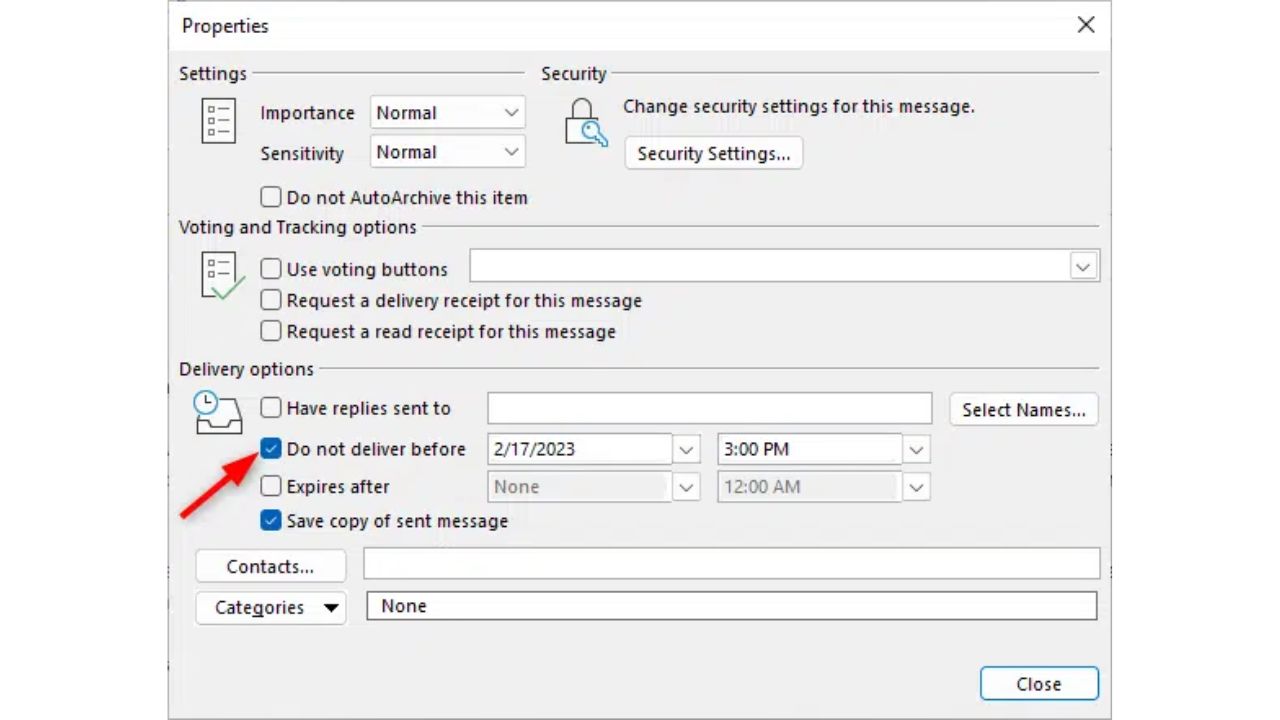
Configure the Date and Time: Click on the “Delay Delivery” or “Delay Send” option. A dialog box will pop up, permitting you to specify the date and time for the email to be sent.
Choose the Date and Time: Within the dialog box, choose the desired date and time for sending the email. You can make selections using the dropdown menus to pinpoint the precise date and time.

Click “Close”: After confirming the preferred date and time, tap the “Close” or “OK” button within the dialog box.
Finalize and Dispatch: Upon scheduling the email, you can finish up any remaining details and then hit the “Send” button.
Verification: Outlook will move the email to the “Outbox” folder and retain it there until the designated date and time. At the specified time, Outlook will automatically dispatch the email.
Note: Remember that your computer needs to be operational and connected to the internet at the scheduled time for the email to be sent.
4. Tips for Effective Email Scheduling in Outlook
- Consider your recipient’s time zone when choosing a delivery time.
- Experiment with different delivery times to determine when you get the best responses.
- Utilize the scheduling feature for reminders or follow-up emails.
5. How to Edit or Cancel a Scheduled Email in Outlook
If you want to edit or cancel a scheduled email in Outlook, follow these steps:
- Open Outlook and go to the Outbox folder.
- Find the scheduled email that you want to edit or cancel and double-click on it to open it.
- To edit the email, make the changes that you want and then click on the Send button again.
- To cancel the email, click on the Actions tab and then click on the Recall This Message button in the Move group.
- In the Recall This Message dialog box that opens, choose whether you want to delete the unsent copy of the message or replace it with a new message and click OK.
Using the scheduling feature in Outlook can be a real time-saver, ensuring you never miss crucial deadlines. Through the Delay Delivery option, you can effortlessly set up emails to be sent at a later time. Furthermore, if you need to make changes or decide not to send a scheduled email, you can easily do so by navigating to the Outbox folder and using the Recall This Message feature. We trust this guide has provided you with a clear understanding of how to schedule an email in Outlook.
6. FAQs
Can I schedule emails in Microsoft Outlook?
Yes, Microsoft Outlook allows you to schedule emails to be sent at a later time and date.
How do I schedule an email in Outlook?
To schedule an email in Outlook , compose your email as usual, then click on the “Options” tab in the message window. Select “Delay Delivery” or “Send Later,” and choose the date and time you want the email to be sent.
Is the scheduling feature available in all versions of Outlook?
The email scheduling feature is available in most versions of Outlook, including Outlook for Windows, Outlook for Mac, and Outlook on the web.
Can I change or cancel a scheduled email in Outlook?
Yes, you can change or cancel a scheduled email in Outlook before the scheduled send time. Locate the email in your “Outbox” or “Scheduled” folder, open it, and make the necessary changes or cancel the send.
What happens if my computer is turned off at the scheduled send time?
If your computer is turned off or Outlook is closed at the scheduled send time, Outlook will send the email when you next open the application and connect to the internet.
>>> See more: How to Uninstall Apps on Mac: 5 Simple Ways


